How to Make a Perfect Cake with a Cake Pan
Creating the perfect cake isn’t just about following a recipe; it’s about mastering the techniques and tools that elevate your baking to the next level. One of the most crucial tools in your kitchen arsenal is the cake pan. Selecting and using the right pan can significantly impact the texture, appearance, and overall success of your cake. In this tutorial, I’ll guide you through the step-by-step process of baking a perfect cake, from choosing the ideal cake pan to getting that flawless finish. Let’s get started!
Step 1: Choose the Right Cake Pan
Before you even think about mixing ingredients, you need to choose the right cake pan. The material, size, and shape of the pan will influence how your cake bakes.
What to Consider:
- Material: Aluminum pans are excellent for conducting heat evenly, ensuring your cake bakes consistently throughout. Non-stick pans are great for easy release, but you need to handle them carefully to avoid scratches.
- Size: The size of your pan should match your recipe. If a recipe calls for an 8-inch round pan and you use a 10-inch, your cake will be thinner and may bake faster than expected.
- Shape: Round pans are classic for layer cakes, while square, rectangular, and bundt pans can add visual interest. Each shape will affect baking time slightly, so adjust as needed.
Once you’ve selected your pan, it’s time to prep it properly.
Step 2: Prepare the Pan
Properly preparing your cake pan can be the difference between a cake that slides out easily and one that sticks.
How to Prep:
1. Grease the Pan: Use butter or a non-stick spray to grease the inside of the pan. Make sure to cover all corners and edges, especially with intricate shapes like bundt pans.
2. Dust with Flour: After greasing, lightly dust the pan with flour. Tap the pan to distribute the flour evenly, then shake out any excess. For chocolate cakes, cocoa powder can be used instead of flour to avoid white residue.
3. Parchment Paper (Optional): For extra security, line the bottom of the pan with parchment paper after greasing and flouring. This is particularly useful for delicate cakes that may be prone to sticking.
Step 3: Prepare the Batter
Now that your pan is ready, it’s time to prepare the cake batter. This is where the magic happens!
Ingredients:
– 2 ½ cups all-purpose flour
– 2 ½ tsp baking powder
– ½ tsp salt
– 1 cup unsalted butter, room temperature
– 1 ¾ cups granulated sugar
– 4 large eggs, room temperature
– 1 tsp vanilla extract
– 1 cup whole milk, room temperature
Instructions:
1. Preheat the Oven: Set your oven to the temperature specified in your recipe (usually around 350°F or 175°C). This allows the oven to reach the right temperature while you prepare the batter.
2. Mix Dry Ingredients: In a medium bowl, whisk together the flour, baking powder, and salt. This ensures that the leavening agents are evenly distributed throughout the cake.
3. Cream Butter and Sugar: In a large bowl, beat the butter and sugar together until light and fluffy. This can take about 4-5 minutes with an electric mixer. Proper creaming incorporates air into the batter, resulting in a lighter cake.
4. Add Eggs: Add the eggs one at a time, mixing well after each addition. This helps to emulsify the batter, ensuring a smooth and cohesive mixture.
5. Add Vanilla: Stir in the vanilla extract. It’s the little details like this that add depth to your cake’s flavor.
6. Alternate Dry Ingredients and Milk: Gradually add the dry ingredients in three parts, alternating with the milk in two parts. Start and end with the dry ingredients. This technique prevents overmixing and ensures a tender crumb.
Step 4: Pour the Batter into the Pan
Once your batter is smooth and ready, it’s time to transfer it to the prepared cake pan.
Tips for Pouring:
– Fill Evenly: Pour the batter into the pan and use a spatula to spread it evenly. This ensures an even rise during baking.
– Avoid Overfilling: Don’t fill the pan more than 2/3 full. This gives the cake room to rise without spilling over the edges.
– Tap the Pan: Gently tap the pan on the counter a few times to eliminate air bubbles trapped in the batter. This helps to avoid large holes or craters in your finished cake.
Step 5: Bake the Cake
Place your cake pan in the center of the preheated oven. Positioning in the middle ensures even heat distribution.
Baking Tips:
– Set a Timer: Follow the recommended baking time from your recipe, usually between 25-35 minutes for a standard cake. However, start checking your cake 5 minutes before the suggested time. Baking times can vary slightly depending on your oven and the type of pan.
– Check for Doneness: Use a toothpick or cake tester to check the center of the cake. If it comes out clean or with a few moist crumbs, the cake is done. If the batter sticks, give it a few more minutes.
– Avoid Overbaking: Overbaking leads to dry cake, so keep a close eye on it towards the end. The edges should pull slightly away from the pan, and the top should spring back when lightly touched.
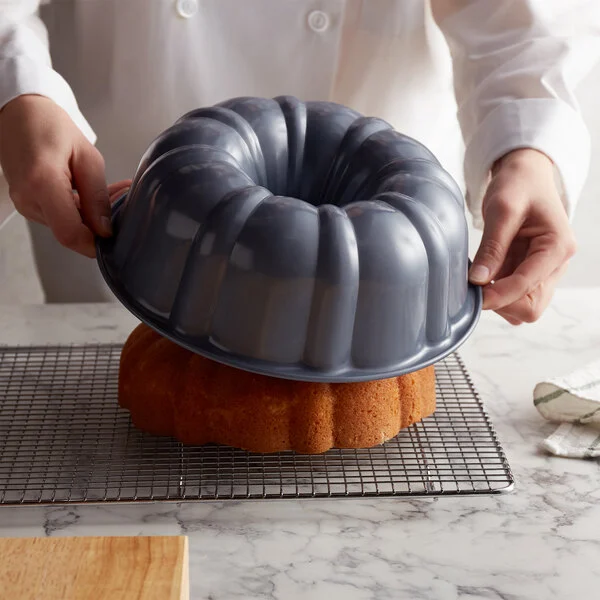
Step 6: Cool and Remove from Pan
This is the final step before you can enjoy your creation. Proper cooling is crucial to maintain the cake’s structure and texture.
Cooling Process:
1. Cool in Pan: Allow the cake to cool in the pan for about 10-15 minutes. This helps the cake firm up, making it easier to remove.
2. Loosen the Edges: Run a knife around the edges of the pan to loosen the cake. Be gentle to avoid damaging the cake.
3. Invert and Release: Place a cooling rack over the top of the pan, then invert both. Gently tap the bottom of the pan until the cake releases. Peel off the parchment paper if you used it.
4. Cool Completely: Let the cake cool completely on the rack before frosting or serving. This prevents the frosting from melting and ensures the cake sets properly.
Step 7: Frost and Decorate
Once your cake is cool, it’s time for the fun part—frosting and decorating!
Decorating Tips:
– Crumb Coat: Apply a thin layer of frosting to seal in any crumbs. This creates a smooth base for your final layer of frosting.
– Use a Spatula: A straight or offset spatula helps spread the frosting evenly and smoothly.
– Get Creative: Add sprinkles, fruit, or other decorations to give your cake a personalized touch.
Final Thoughts
Mastering the art of baking a perfect cake involves more than just following a recipe. It’s about understanding the role of your tools—like the cake pan—and using them to your advantage. By choosing the right pan, preparing it properly, and following the steps outlined in this tutorial, you’ll set yourself up for success every time.
Whether you’re baking for a special occasion or simply satisfying a sweet craving, remember that practice makes perfect. Each cake is an opportunity to refine your skills, experiment with new techniques, and most importantly, enjoy the delicious fruits of your labor.
Happy baking!